
1.1 Introduction
This web page provides a step-by-step walkthrough guide to the use of Microsoft (MS) Teams for tracking Agile and Agile Scrum projects (and others). Click here to purchase 200+ project management templates with FREE upgrades thereafter.
This is by making use of the Planner add-in (Free app) for ‘Tasks by Planner and To Do’ items. This offers a useful Project board for displaying Agile stories (tasks) under columns as shown below.
What follows is a step-by-step guide to constructing an Agile Project Board for your projects which you can tailor as required. It also serves as a good general guide to using Planner is MS Teams for any tasks that need to be carried out on a project or programme of work.
Join the FREE PM templates related Facebook Group (LIKE Facebook page) and LinkedIn Group. Click here to purchase 200+ project management templates with FREE upgrades thereafter (NOTE: reduced price for a limited time only). The templates also include a Word document to walkthrough the MS Teams Planner set-up for Agile.
2.1 Create an Agile Project Team from Scratch
Before you get started, you will need to create a team if you don’t already have one. Click the ‘Join or create a team’ link in the bottom left hand corner of the MS Teams screen.
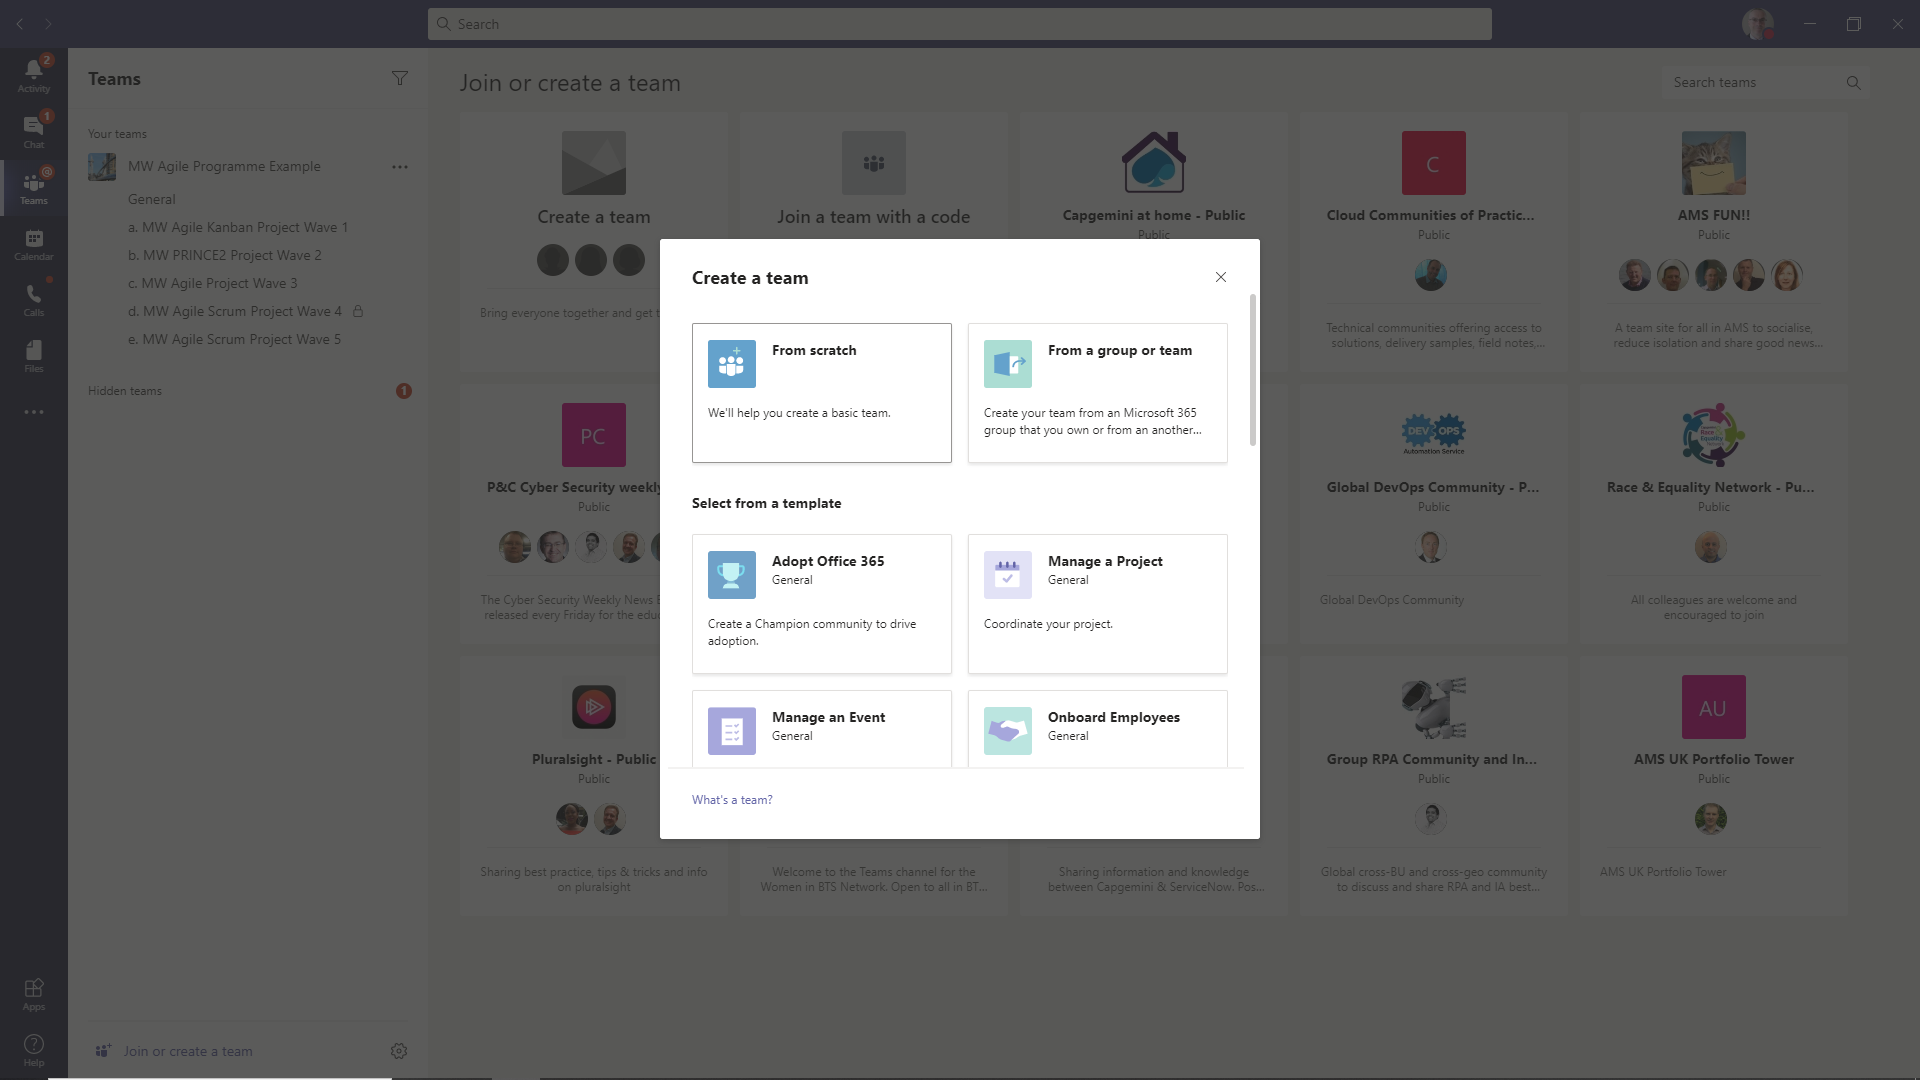
You will be presented with a number of Tiles. Click the ‘Create a team’ Tile to then be presented with the Central window dialog above. For this walkthrough, we will assume you are creating an MS team from scratch.
This team will be the overarching team group to which you can add one or more Agile project waves (called Channels in MS Teams) as shown above as examples (top left). If you like, you can think of this particular ‘create team’ as the Programme to which a number of projects are attached shown as Waves above.
It might be that you only have one specific project as part of the team in which case this team addition becomes that project entirely.
2.2 Select the Kind of Project Team Required – Private or Public
Select the type of visibility you require for the team, private or public.
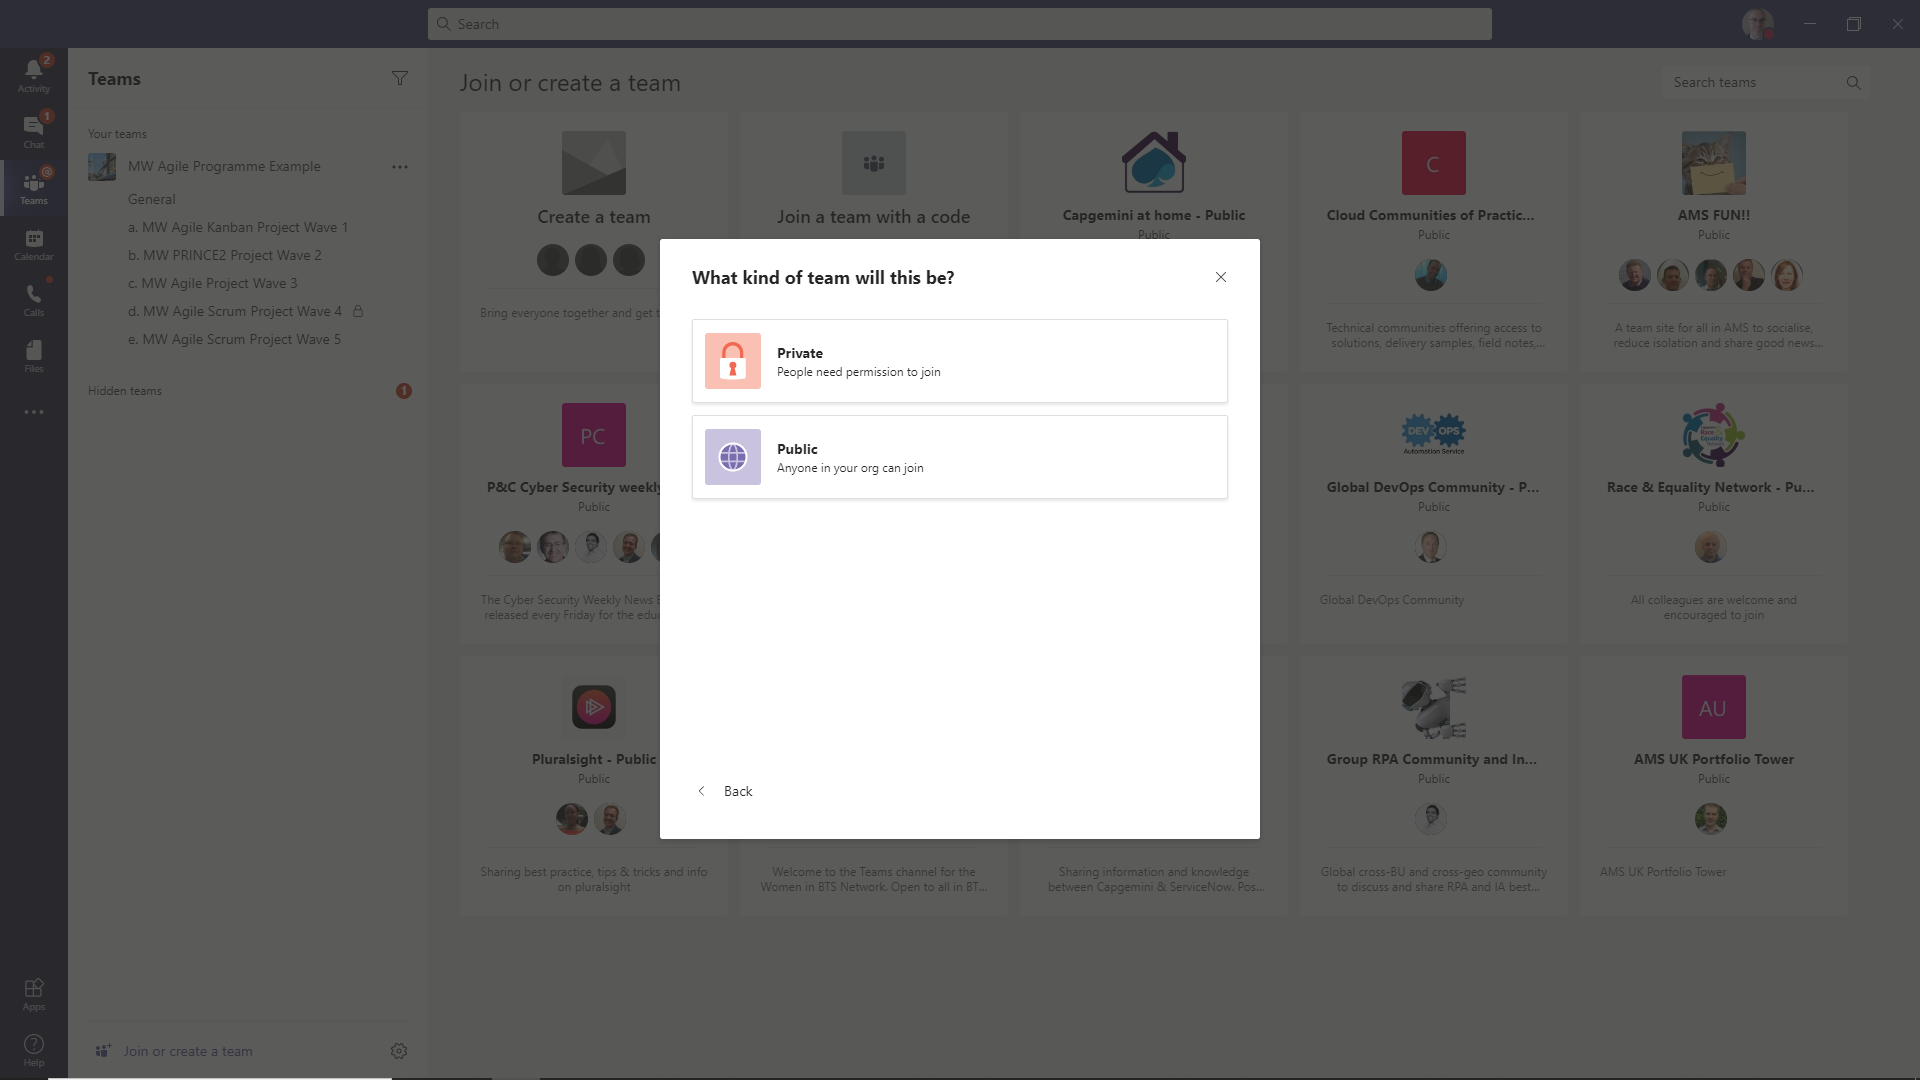
Private – People need permission to join and the creator of the team (most likely you) will be emailed for permission to join the group.
Public – Anyone in your organisation can join without approval.
2.3 Enter the Title of the Agile Team and a Description
Enter a good description of what the team is for, perhaps also referring to any sub-projects (Agile or Waterfall) that are contained in the team.

Remember you can have many Projects (called Channels) as sub-items to the team (Programme) being created as shown top left in the screenshot above.
2.4 Add Appropriate Members to your Agile Project Team
At this point, you can add in any team members you want to be part of the team or you can do this later once you have refined your team and project set-up.
Project Management Templates for both Agile and Waterfall project planning and tracking.
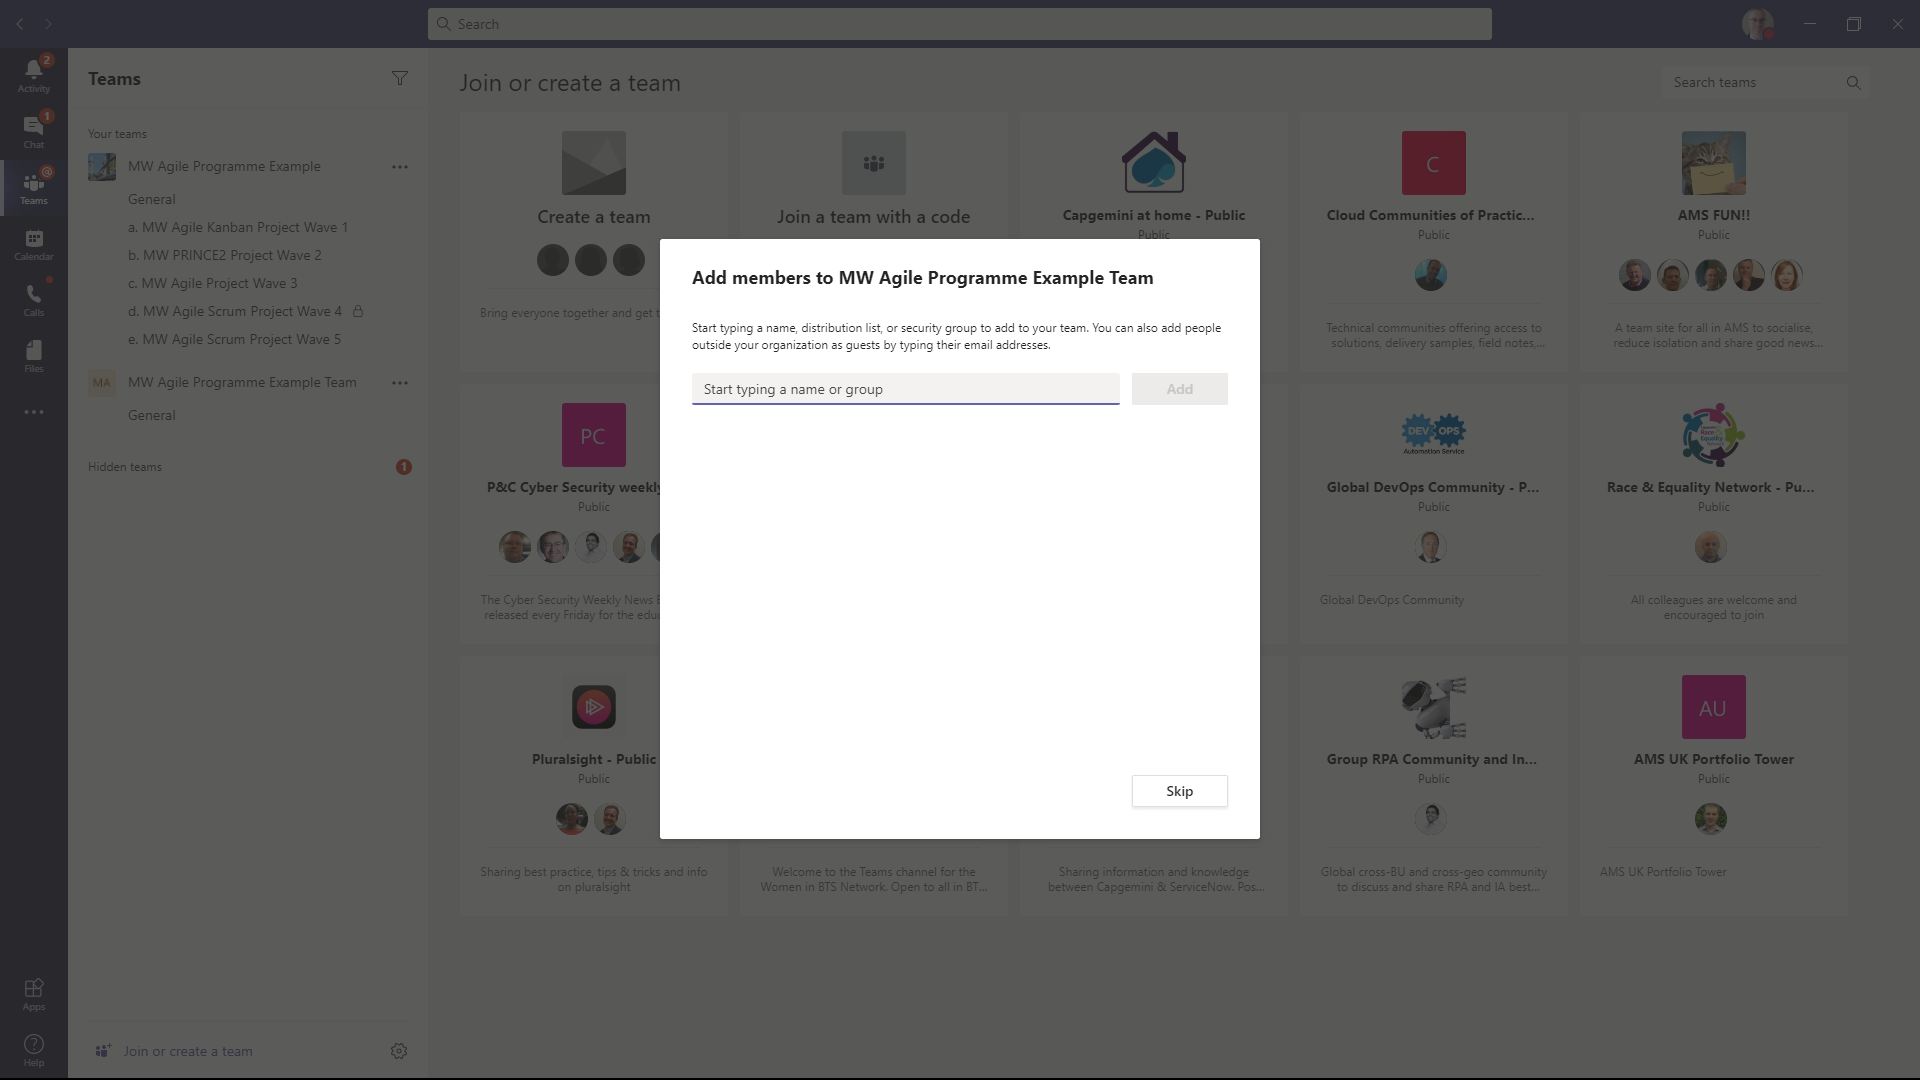
Enter team members as required or skip this step and come back to it later by clicking the button in the bottom right hand corner of the Central dialog window.
2.5 Add an Appropriate Picture to your new Agile Project Team
Change the default text icon to an appropriate picture if required to enable your new team to be more eye catching and appropriate based on branding or locality.
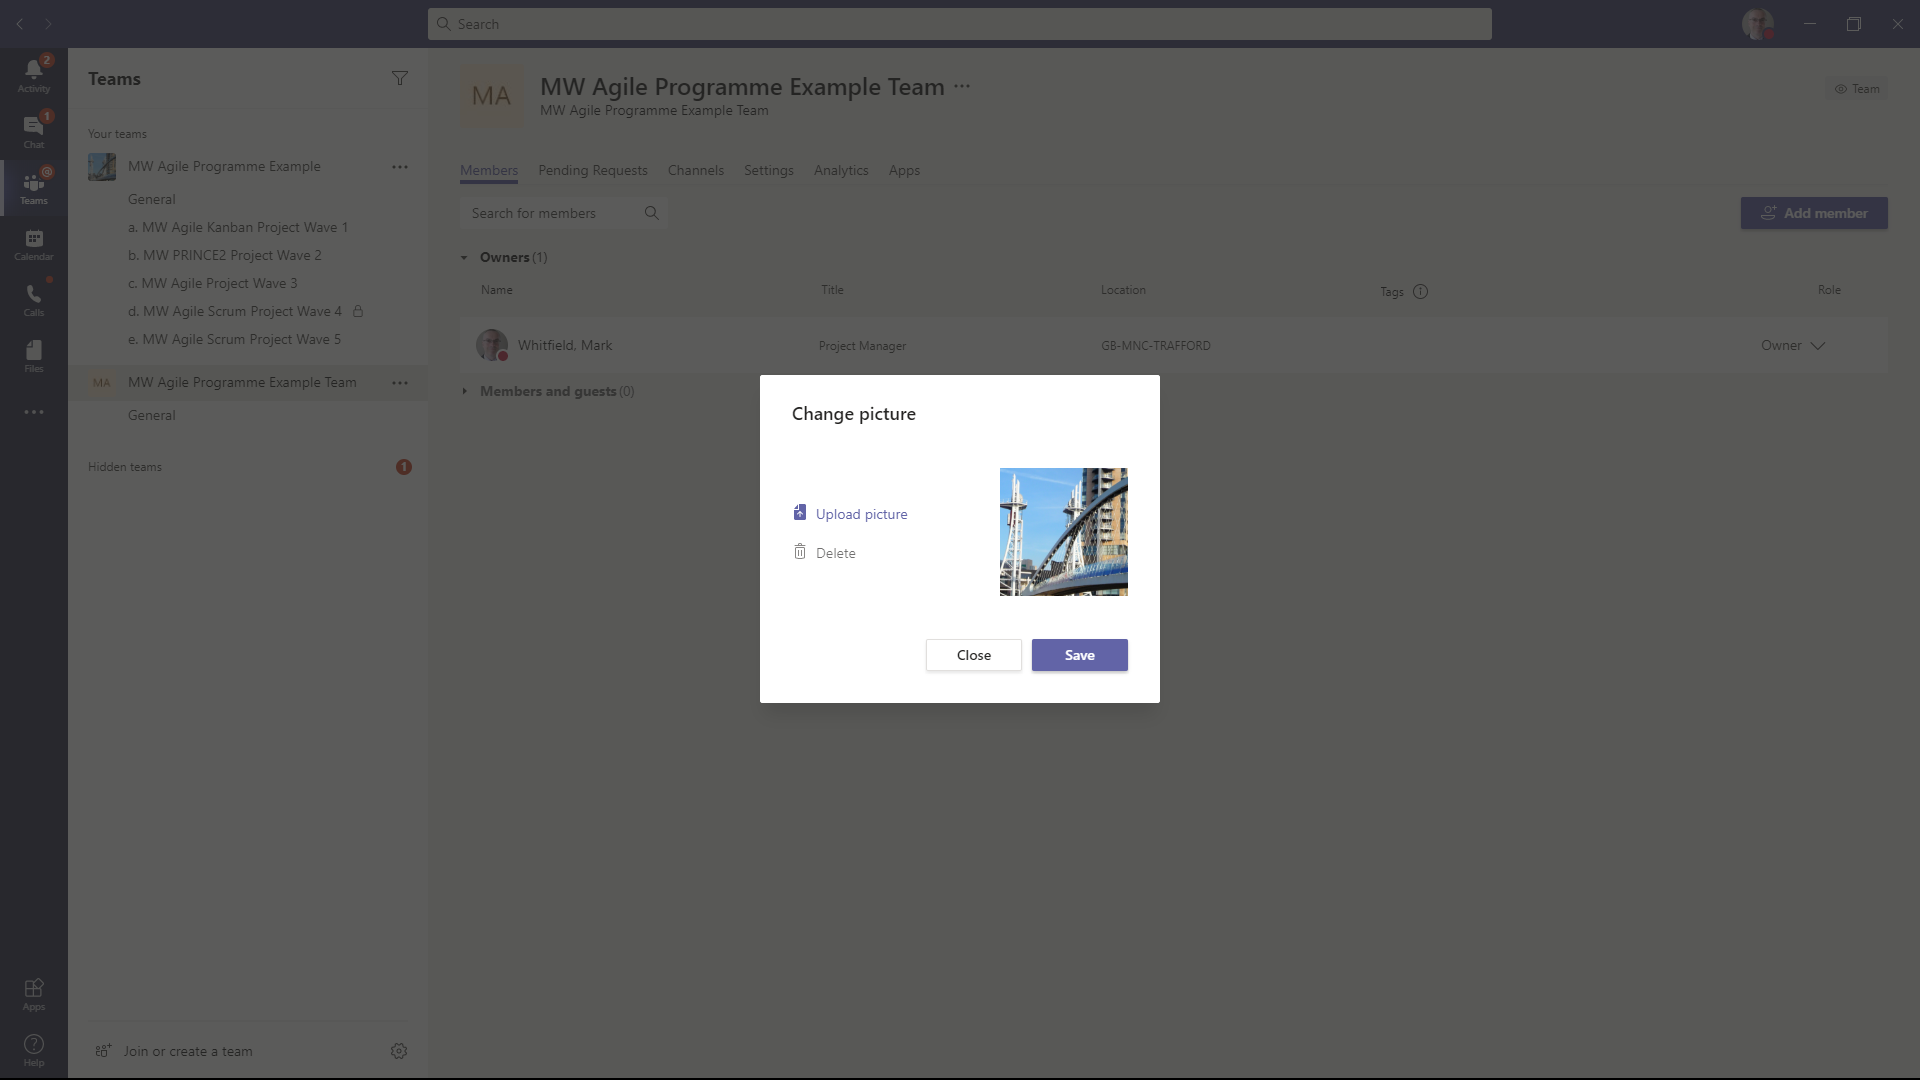
The picture can be uploaded from your local drive and it will be cropped/re-sized automatically by MS Teams to provide the correct aspect ratio for display.
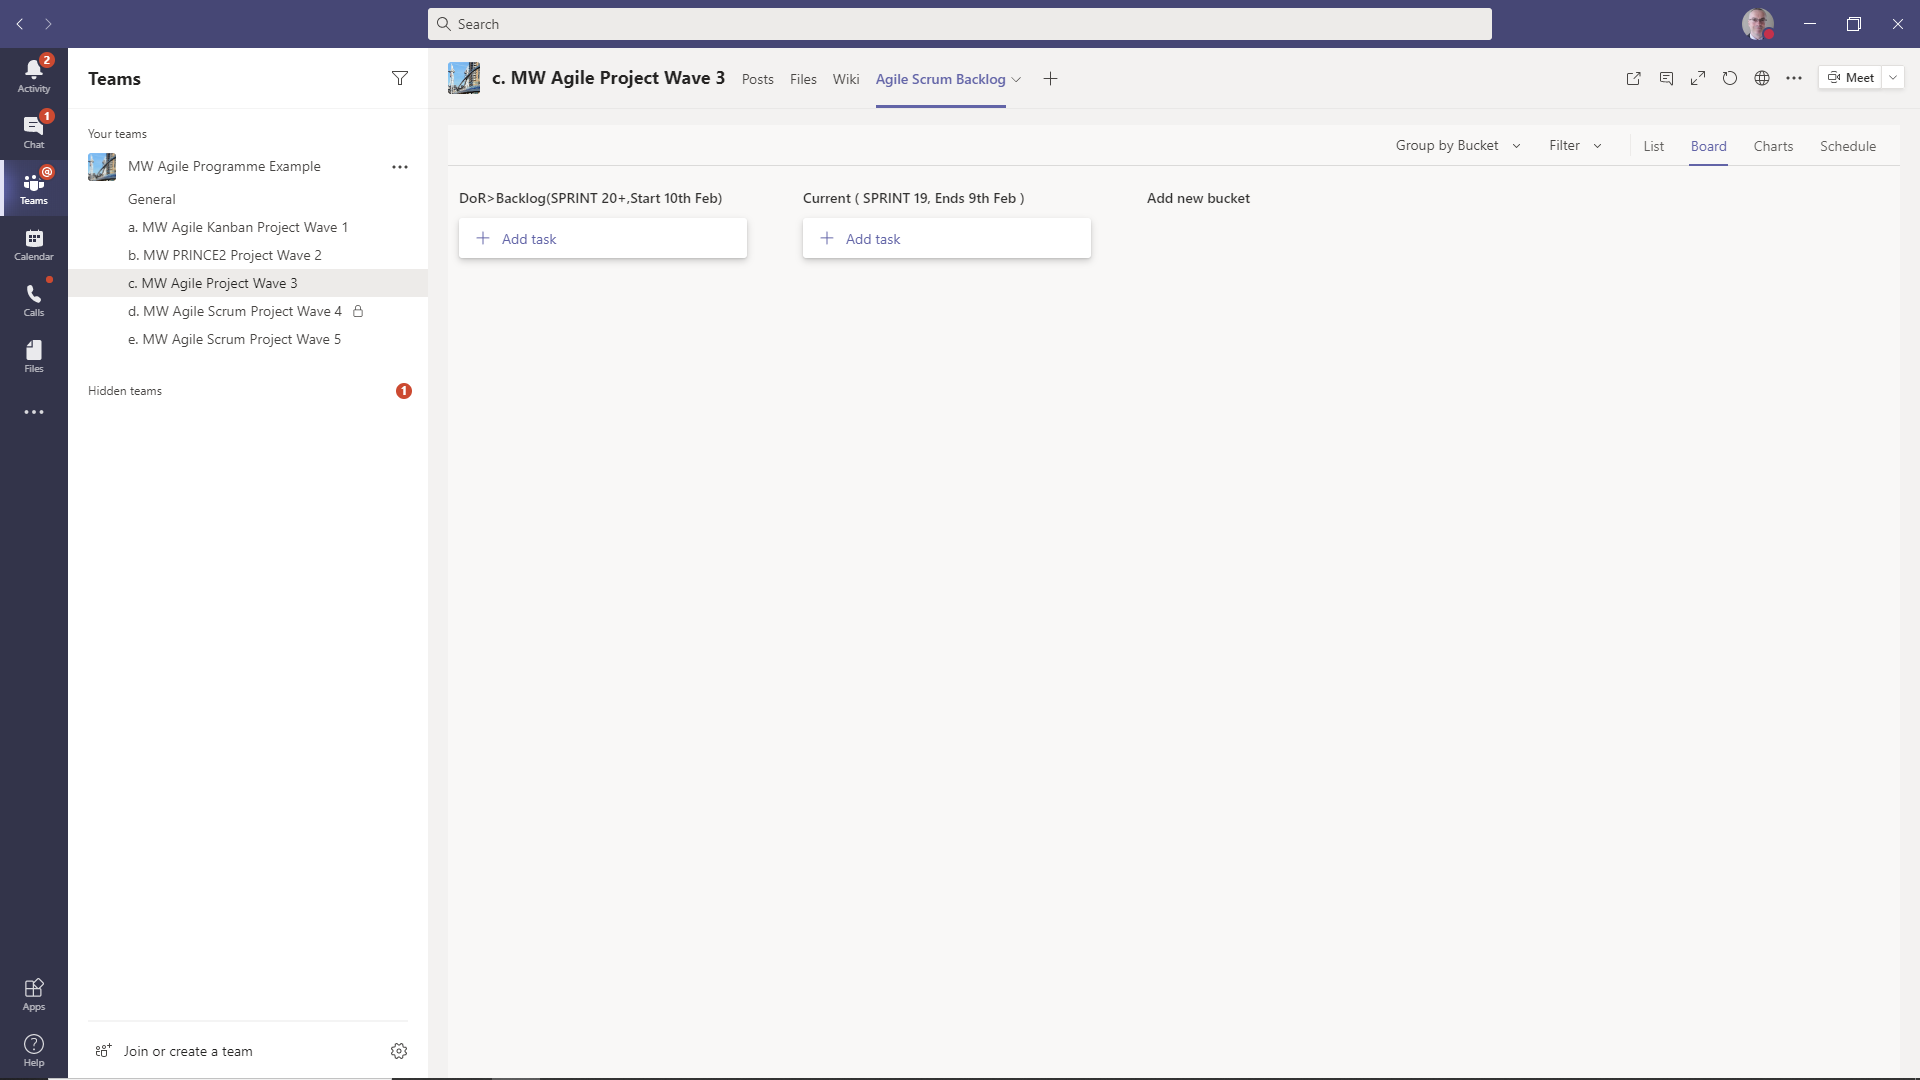
3.1 Add Channel(s) (Agile Projects) to your New Team entry
For your new Team, click the three dots at the top right of your new Team as shown below and then click the ‘Add channel’ option to add a new channel (effectively a Project).
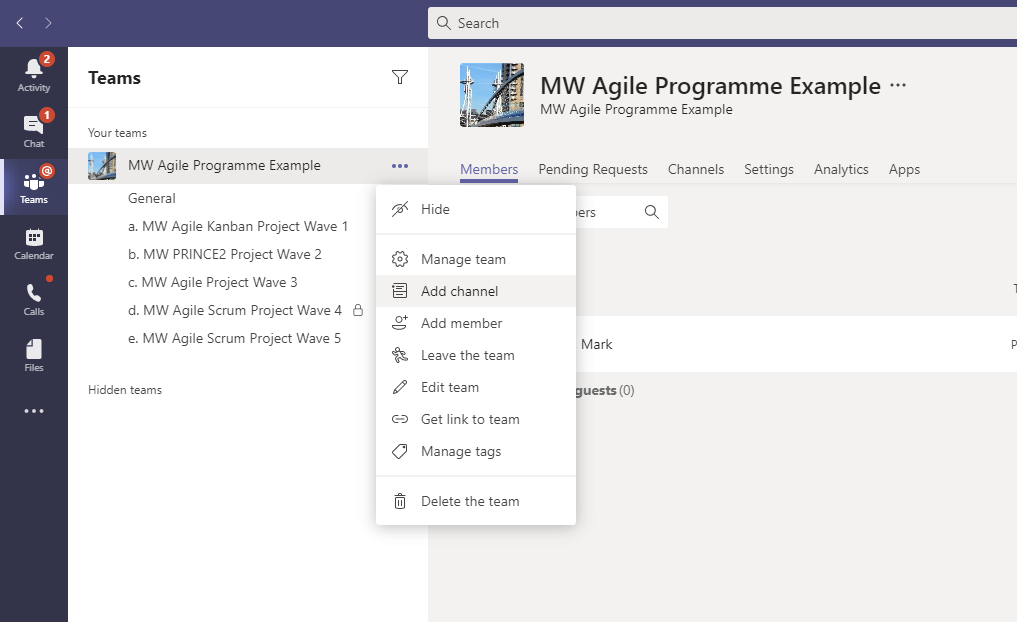
Examples of previously added Channels (projects) are shown top left, for this Programme.
3.2 Add a good Description for your new Channel (Agile Project)
Under the ‘Create a channel for….’ Text shown below, add a good title and description for your new Channel (Project).
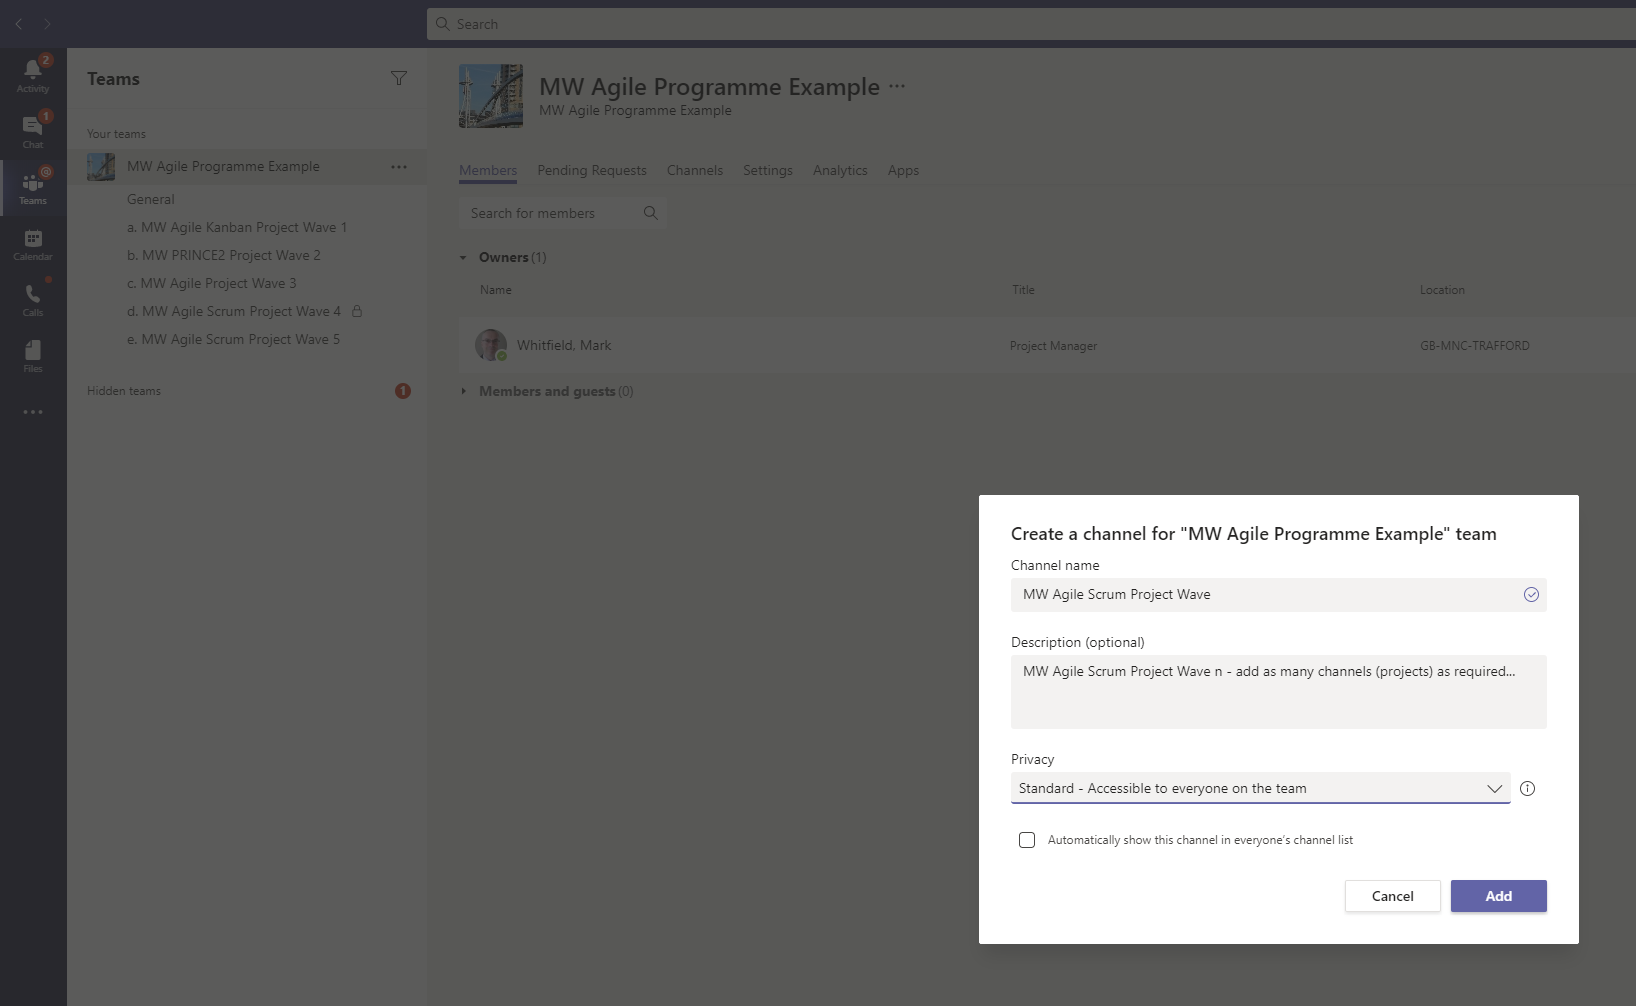
Set the appropriate Privacy option for your Project (Channel) in the last drop down menu option shown.
You can delimit members based on each Channel and as such, have only Project Team members relevant to a particular Agile project approved or you can have all members that belong to the overarching team, access any of the Channels (projects) for that MS team.
3.3 Add a New Tab at the top of the Selected Team Channel
The next step to carry out is to add an Agile Board to a particular Channel (Agile project).

In the screenshot above, we are adding a new Agile Board to the ‘MW Agile Scrum Project Wave 4’ channel (Project) by positioning on the ‘+’ button (Add a tab) shown top middle of the screenshot. Clicking this will present you with a similar screen to that shown below.
3.4 Add the Task Planner App to your Agile Project Team
Click on the icon called ‘Tasks by Planner and To Do’ which in the screenshot below, is shown top left.

NOTE: you can add any number of Apps as tabs using this screen so perhaps explore other options later, e.g. Power BI, Jira Cloud.
3.5 Add New Bucket Columns to the Agile Project Board
The Agile Board is created and now it is time to add the appropriate ‘buckets’ (columns) to the Agile board.
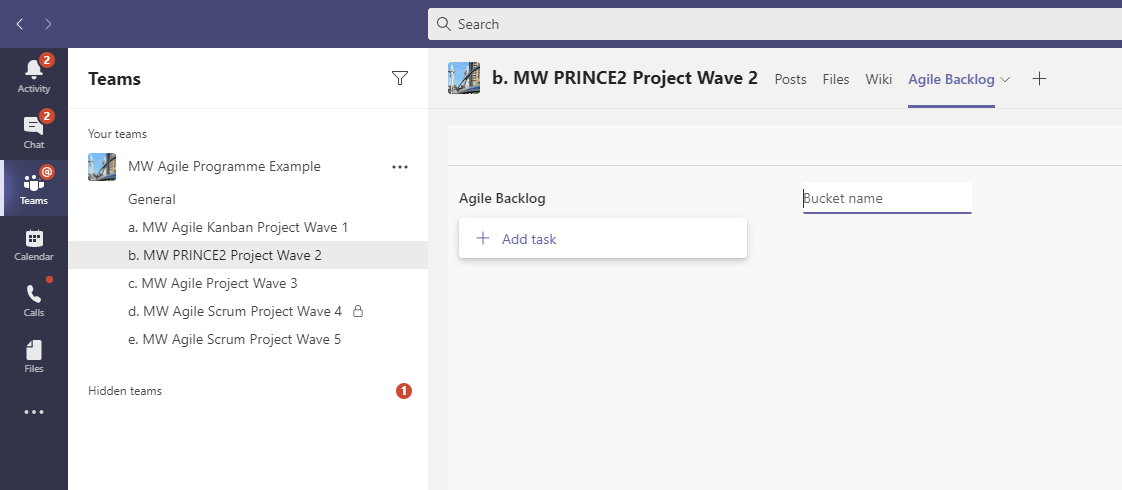
Click on the Bucket (Column) name as shown above to add in the columns you require.
As a guide I would recommend (as examples) for your Agile board;
1. DoR>Backlog ( SPRINT 20+, Start 10th Feb )
2. Current ( SPRINT 19, Ends 9th Feb )
3. Agile Stories Blocked / On-Hold
4. Submitted for Review (DoD)
5. Agile Stories Complete (DoD Signed-off)
So 5 columns (buckets) in total reflecting stories in the Agile Backlog and those in-flight in the current Sprint.
4.1 Start to Build your Agile Project Board with Stories
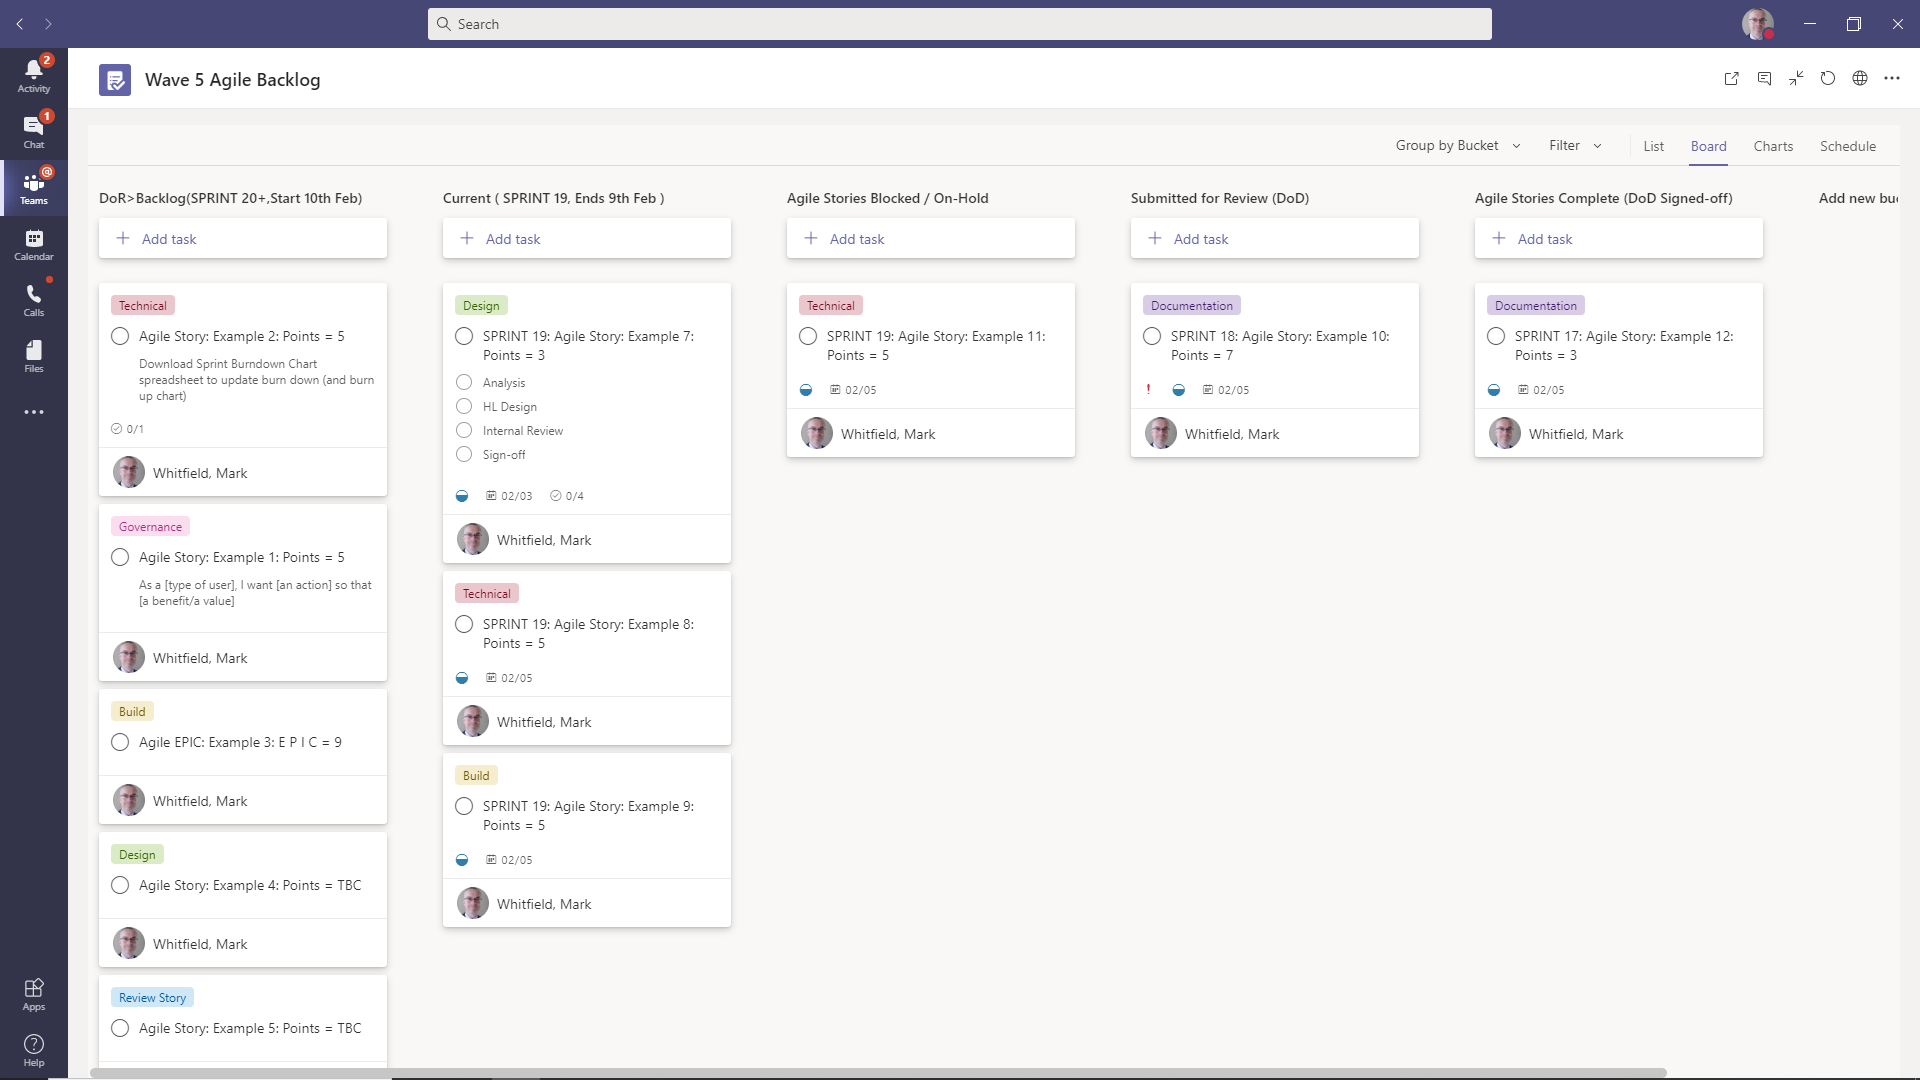
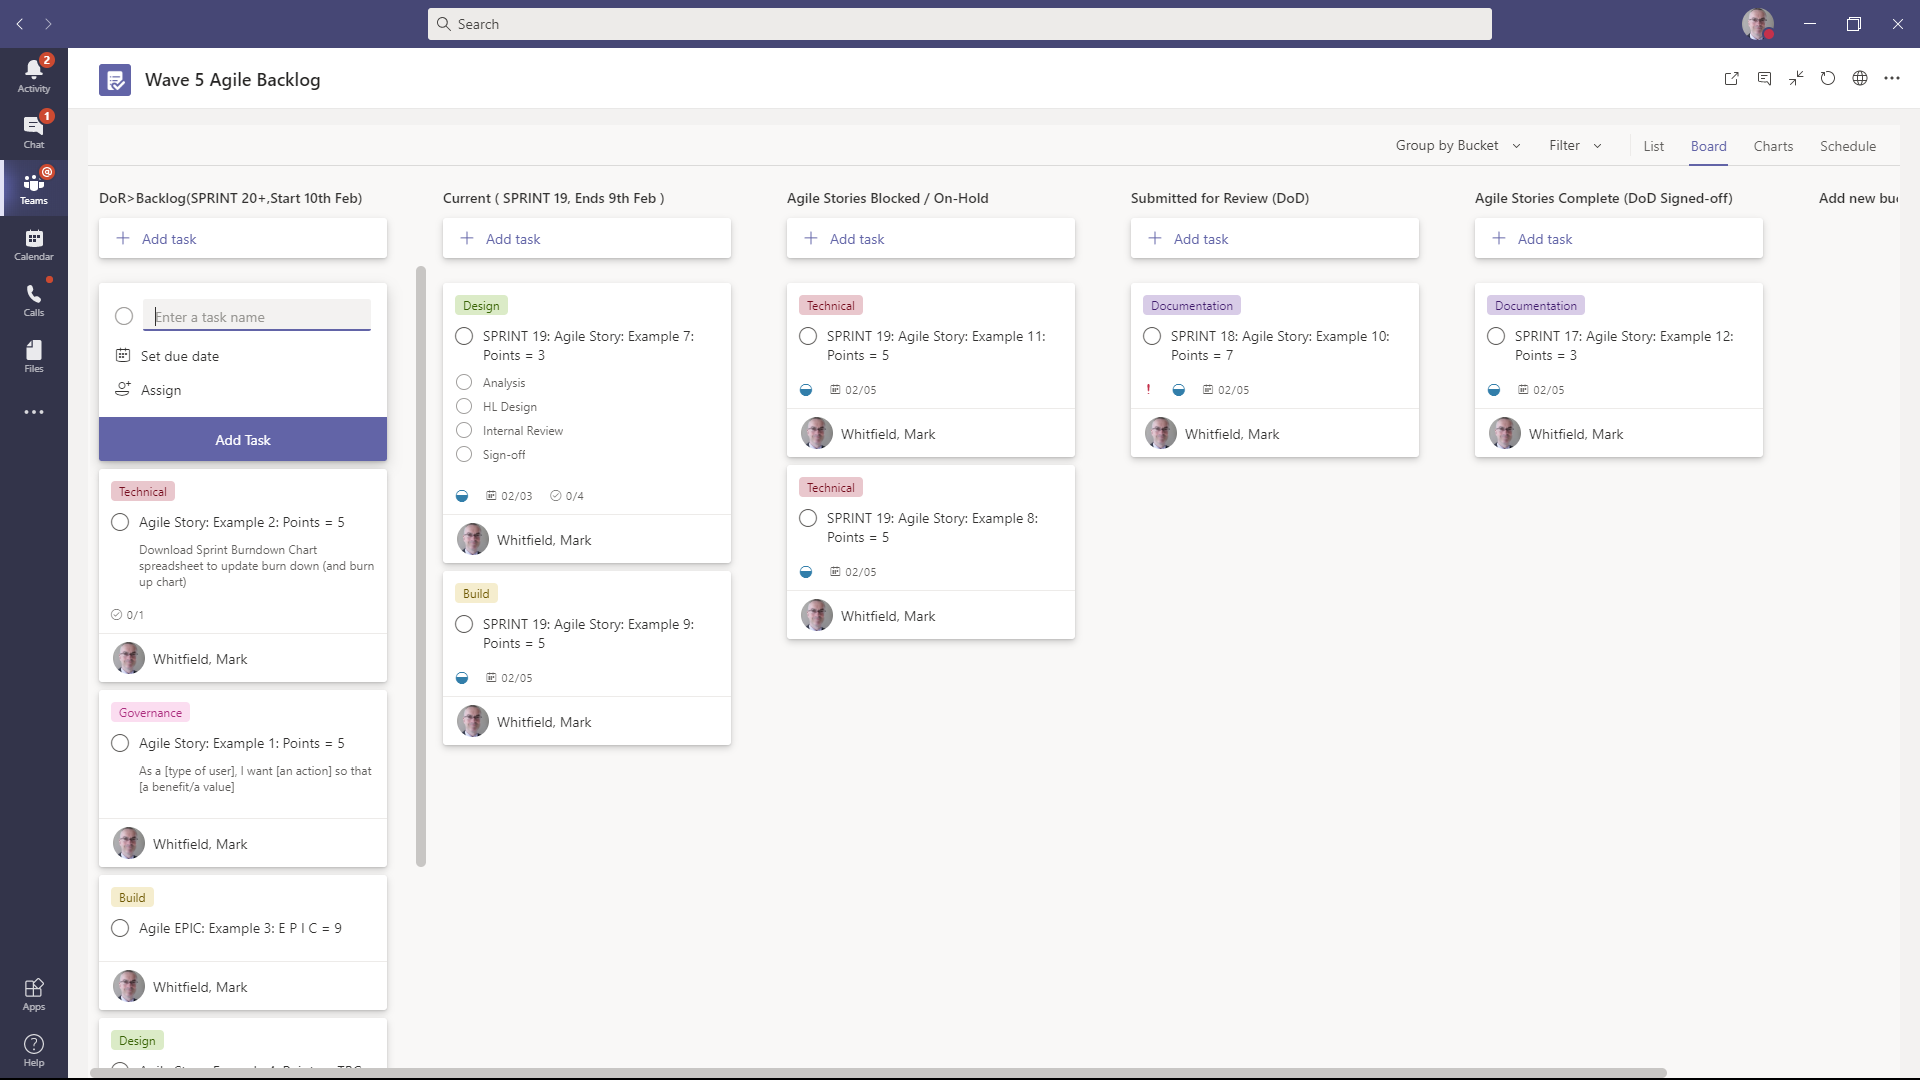
With these ‘bucket’ (column) headings you can start to construct an Agile Project Board as shown below as an example.

The Agile Project Backlog in the leftmost column for work to be assigned to a Sprint. The second column to the right are the Agile stories in-flight. I have prefixed working, in-flight stories (titles) with the Sprint number and also highlighted story points (based on Sprint Planning) in the Story title (we will get to this later in this guide).
The last 3 columns (buckets) represent Agile stories on-hold followed by any stories/ deliverables that require review (internally or with the client) and the last column (bucket) is for Agile stories that are Completed (signed-off as required).
4.2 Maximise the Full Agile Project Board on your Desktop
A useful button icon to click is at the top rightmost position of the Agile board (window) which is the middle icon of the five which is the ‘2 arrows’ icon.
This is shown as 2 arrows pointing at each other above as this Agile board window has been maximised to show all the Agile Board buckets (columns) and represents an easier way of viewing the Agile Board.
Click the same icon to re-show your MS Team and subordinate channels (Agile projects) as shown in the previous but one screenshot.
4.3 Dragging the Agile Project Board Stories to Appropriate Buckets
Once Agile Board stories have been added, they can be moved to the appropriate column (bucket) just by dragging the tile with your mouse.

The Agile Board represents a good level of transparency for the project team/ scrum team and for the client if they have access to the same area.
4.4 Grouping Bucket Display Items on the Agile Project Board
As shown below, by selecting the ‘Group by Bucket’ option on the top right of the screenshot, stories on the Agile Board can be arranged by Bucket, Assignee, Progress, Due date, Labels and Priority.

This can be very useful for large product backlogs and Sprints with tens of stories currently in flight.
4.5 Filtering Bucket Display Items on the Agile Project Board
Clicking on the ‘Filter’ option on the top right of the Agile Board enables stories to be filtered by many date options.

We can even filter by labels which are the coloured tags you can see on each of the stories above which group Agile stories into categories like Governance, Design, Build, Technical etc. These can be customised as appropriate and are discussed in a section below.
4.6 Switch the Agile Project Board to a Chart Dashboard
Clicking on ‘Charts’ in the top right of the Agile Board provides a Dashboard of stories in flight, not started, completed etc. These panes are arranged by Status, Bucket (column), Priority, Members etc.

This can provide a useful and transparent, quick read-out of Agile Story Board metrics for both team members and client (if access provided).
4.7 Switch the Agile Project Board to the Schedule View
Clicking on ‘Schedule’ on the top rightmost of the Agile Board presents you with a calendar plan of the stories that currently have start and dates assigned.

This view can be displayed by Week or Month, options which can be selected in the top right of the window. The display above is shown by Month which is the default. You can of course scroll through the months as required.
As for all Agile backlogs, the story dates will become more indicative and less firmed as you move lower down in the backlog and some stories may not have been assigned to a Sprint currently. Some stories may still exist as Epics and need further refinement.
5.1 How to Add an Agile Story Task under a Bucket Column
Navigate immediately under an appropriate ‘bucket’ (column) and click on the ‘+ Add task’ button to add a story (or Epic) to the appropriate column.
Enter the name of the story to begin with and optionally a due date and resource assignee depending on the story and its position in the Agile backlog. Further details can be added in the detail window as discussed in the following section.
5.2 Update an Agile Story Task Details by clicking on the Tile
Clicking on a story/ task shows you the detail pane and various fields that can be entered.
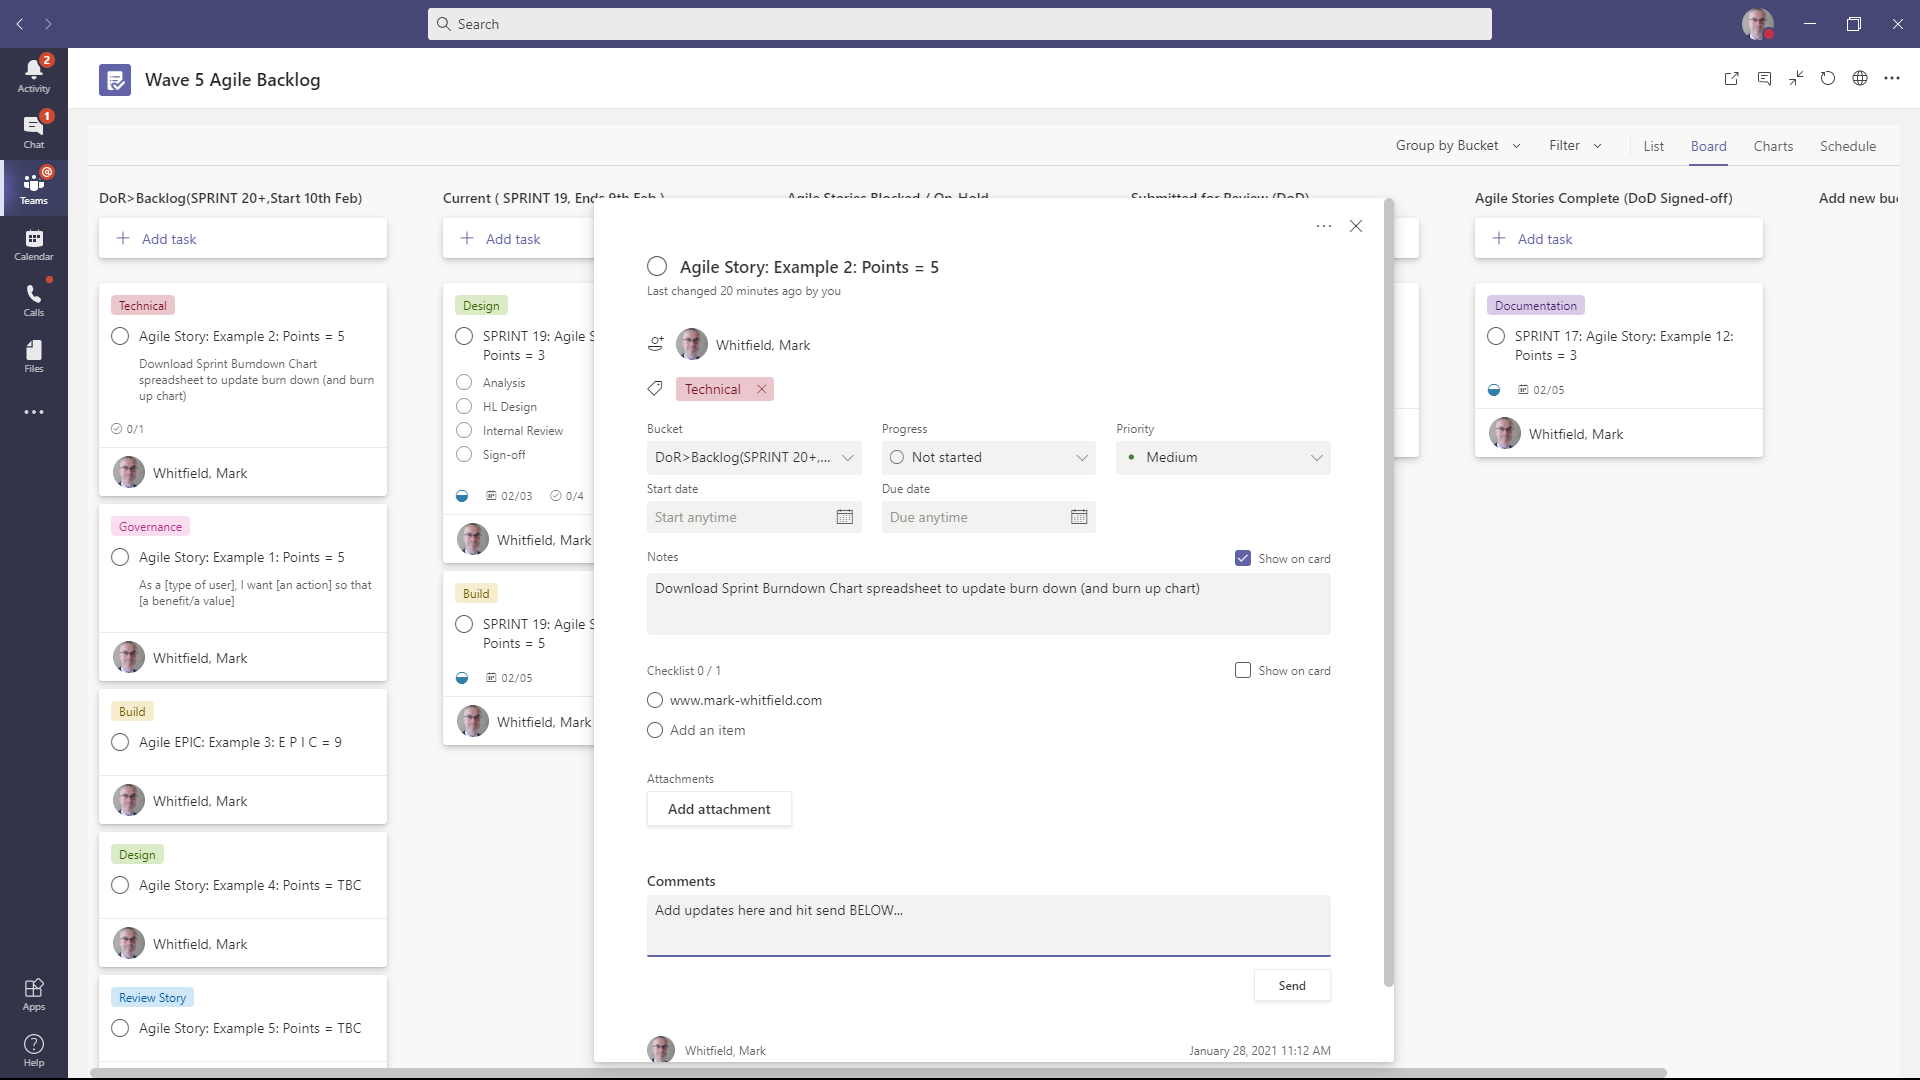
In this window, you can enter much more detail for the task/ story such as labels (discussed later), progress, priority, start date, due date, notes, checklist options, attachments and comments (current status/progress commentary).
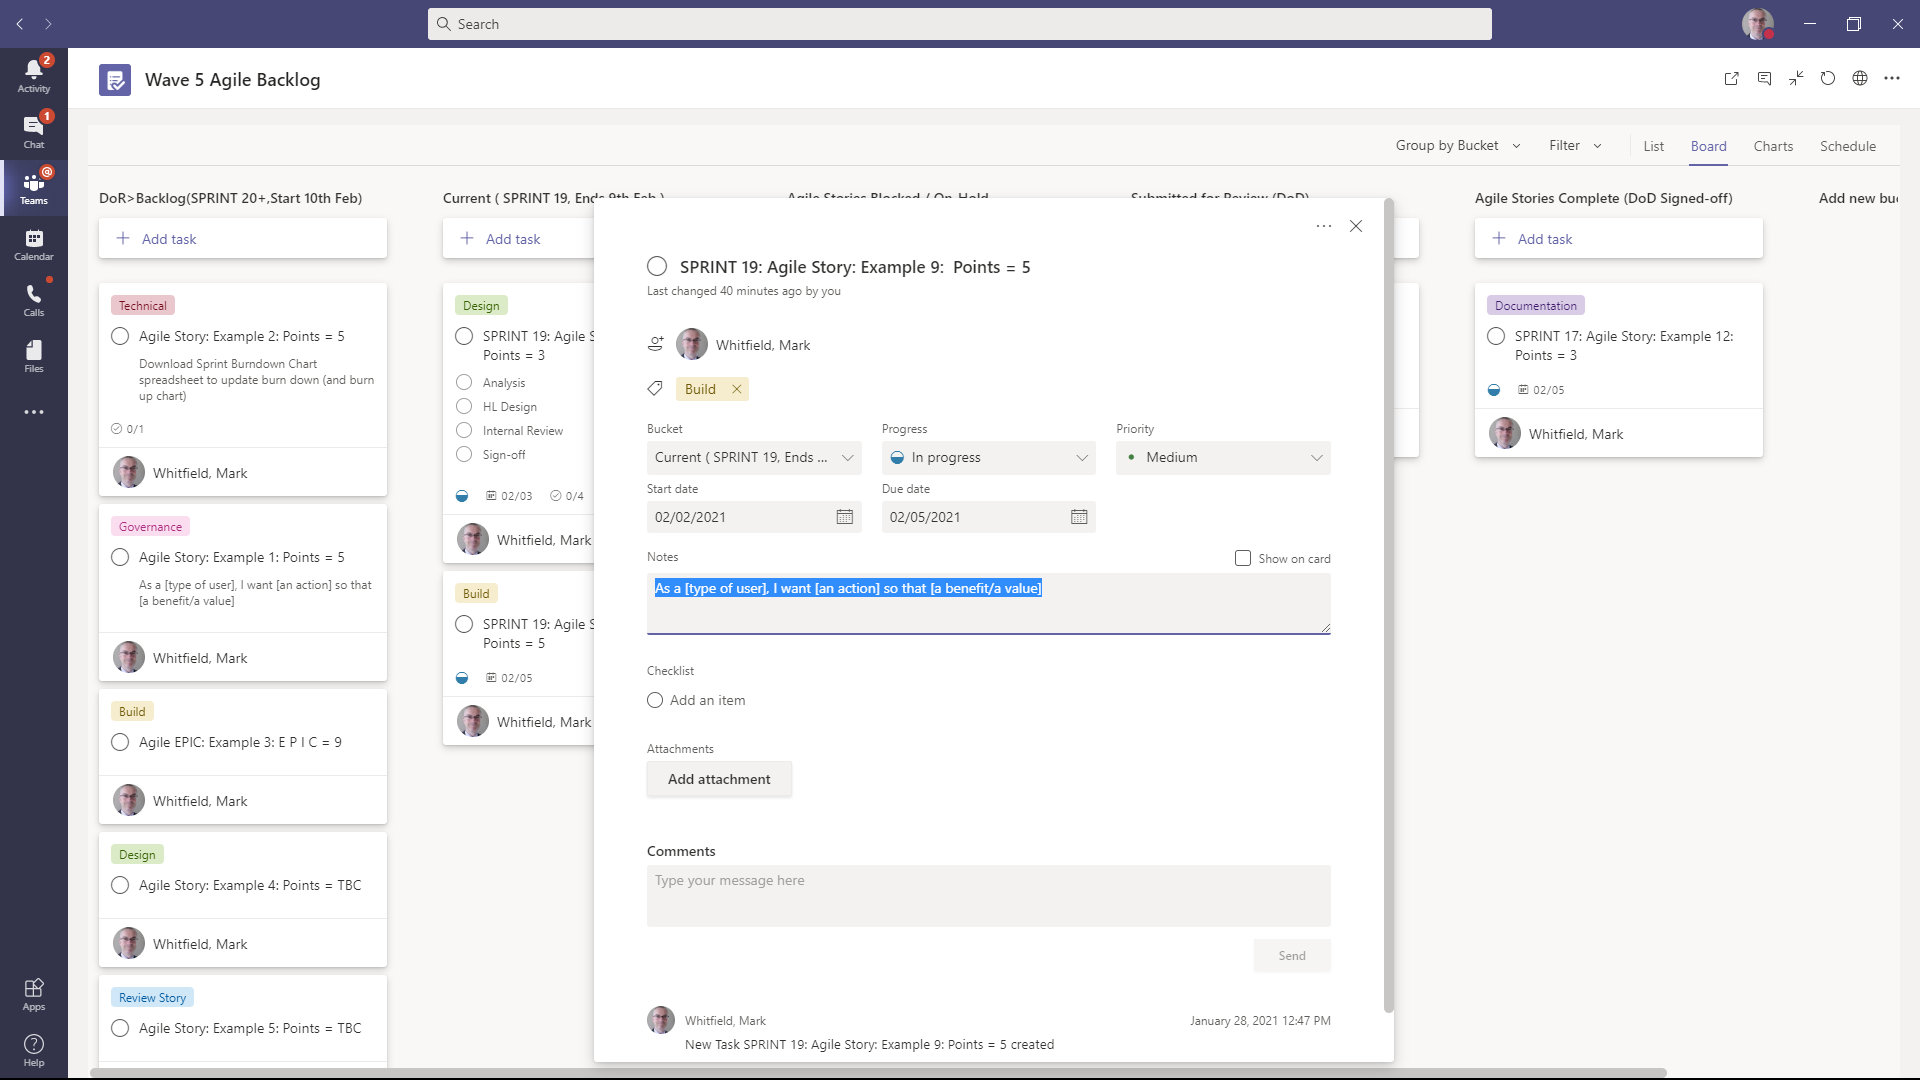
5.3 Ensure that you add Sufficient Agile Story Detail
For the Notes part of the Agile task/ story entry, if available based on planning, add a story description in the format; As a [type of user], I want [an action] so that [a benefit/a value]…
How to construct Agile user stories
Consider the following when writing user stories:
The Definition of “Done” (DoD) — The story is generally “done” when the end user can complete the outlined task, but make sure to define what that outlined task is.
The Definition of “Ready” (DoR) — The story is generally “ready” when the Product Owner is happy that the story can be placed on the Agile backlog as it fulfils all the construct parameters for a well-formed story item.
Outline subtasks or tasks — Decide which specific steps/ items need to be completed and which resource is responsible for each of them.
User personas — For Whom? If there are multiple end users, consider making multiple Agile stories.
Ordered Steps — Write an Agile story for each step in a larger process (also called an EPIC).
Listen to feedback (be collaborative) — Talk to your end users (do it with them and not to them) and capture the problem or need in their words. No need to guess at Agile stories when you can source them from your customers.
Time — Many development teams avoid discussions of time altogether, relying instead on their estimation frameworks. Since stories should be deliverable in one sprint, stories that might take weeks or months to complete should be broken up into smaller stories or should be considered their own epic.
Once the user stories are clearly defined, make sure they are visible for the entire project team.
User story template and examples
User stories are often expressed in a simple sentence, structured as follows:
“As a [type of user], I want [an action] so that [a benefit/a value]…
Breaking this down:
“As a [persona]”: Who are we building this for? We’re not just after a job title, we’re after the persona of the person. MarkW. Our team should have a shared understanding of who MarkW is. We’ve hopefully interviewed plenty of MarkW’s. We understand how that person works, how they think and what they feel. We have empathy for MarkW.
“Wants to”: Here we’re describing their intent — not the features they use. What is it they’re actually trying to achieve? This statement should be implementation free — if you’re describing any part of the UI and not what the user goal is you’re missing the point.
“So that”: how does their immediate desire to do something this fit into their bigger picture? What’s the overall benefit they’re trying to achieve? What is the big problem that needs solving?
For example, user stories might look like:
As MarkW, I want to invite my friends, so we can enjoy this service together.
As MargaretW, I want to organize my work, so I can feel more in control.
As a manager, I want to be able to understand my colleagues progress, so I can better report our success and failures.
This structure is not required, but it is helpful for defining done. When that persona can capture their desired value, then the story is complete. We encourage teams to define their own structure, and then to stick to it.
Getting started with Agile user stories
User stories describe the why and the what behind the day-to-day work of development team members, often expressed as persona + need + purpose. Understanding their role as the source of truth for what your team is delivering, but also why, is key to a smooth process.
Start by evaluating the next, or most pressing, large project (e.g. an EPIC). Break it down into smaller user stories, and work with the development team for refinement. Once your stories are out in the wild where the whole team can see them, you’re ready to get to work.
5.4 Add Agile Story Labels to Categorise the item into Type of Story
Story labels can be added to each story (more than one if required) to categorise the Story in an appropriate area, e.g. build, design, governance and so on. Even adding a label of ‘Review Story’ is a good tip so that a Product Owner can review the story for its ‘Definition of Ready’ and feedback to the Story writer.
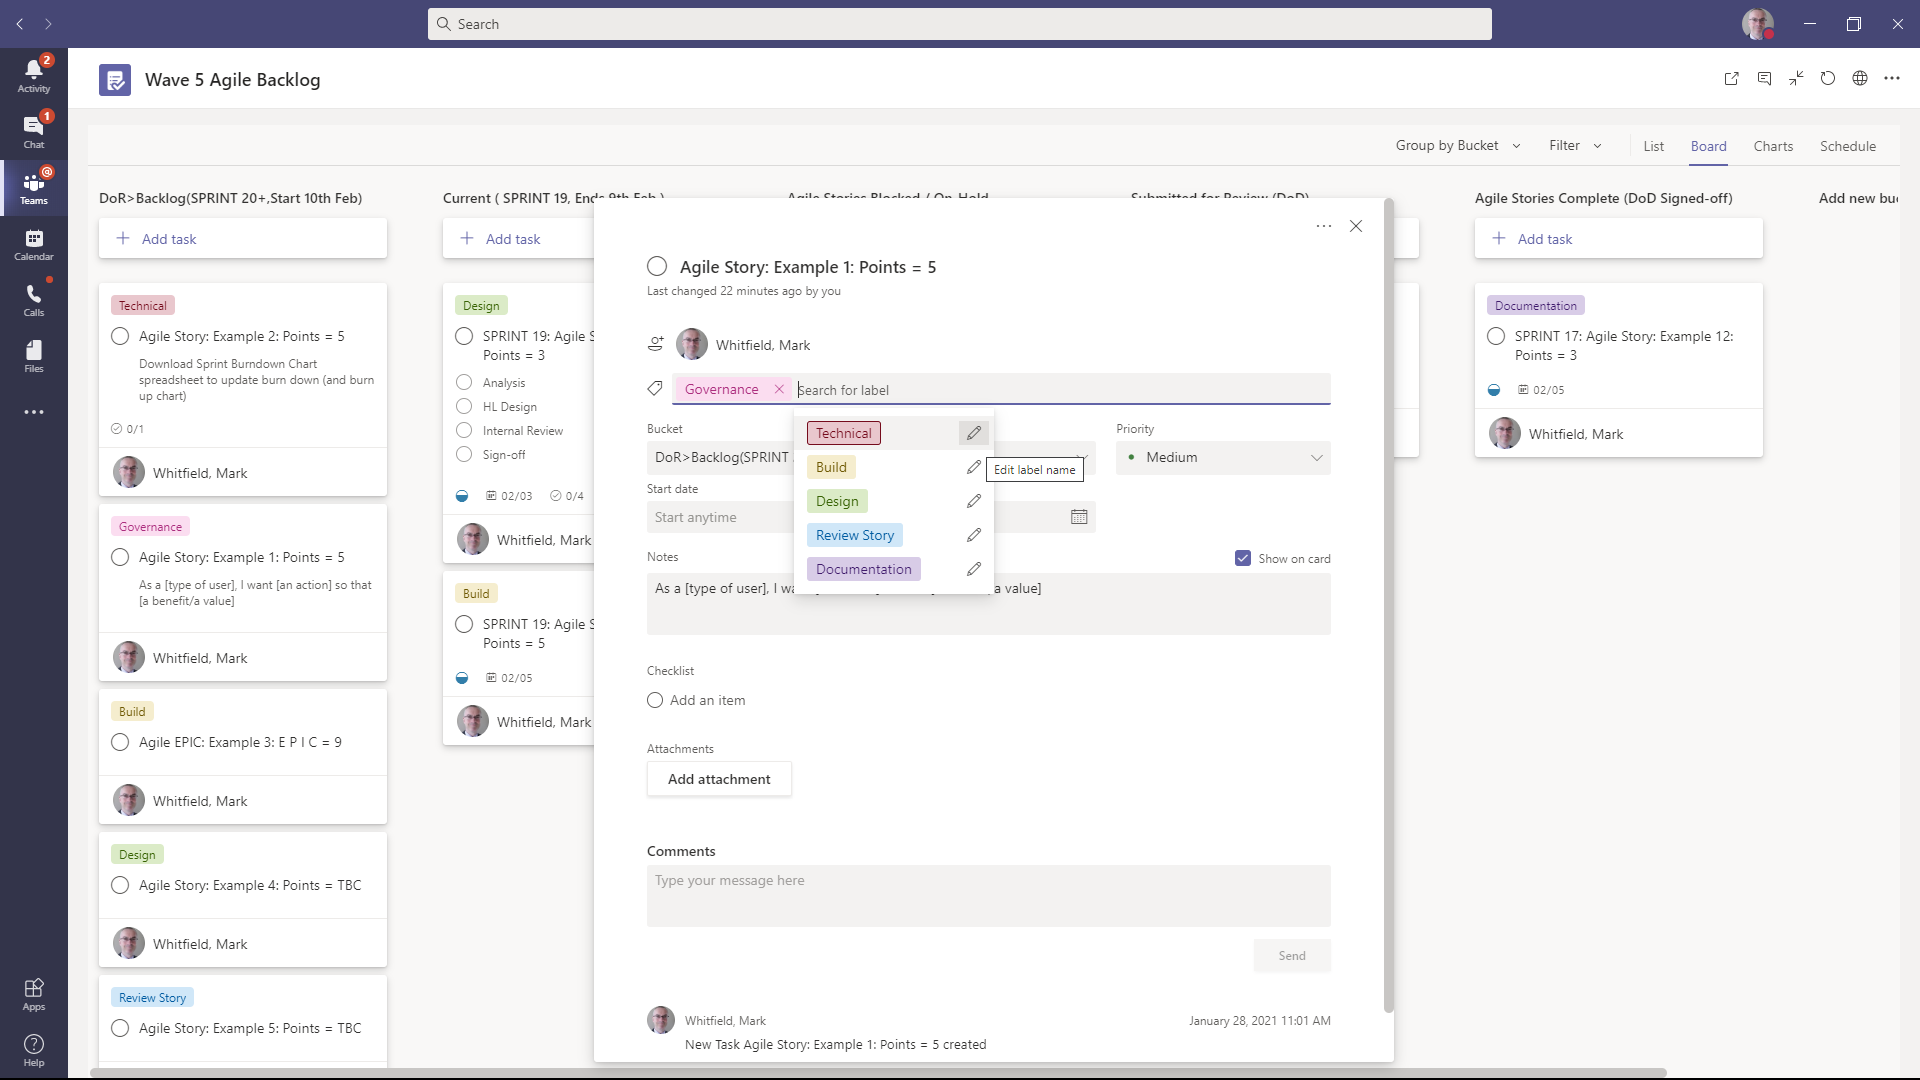
NOTE: Changing the labels to your own preferred settings will change that same label across all stories.
5.5 Copy Stories to create new Stories more quickly on the Board
For ease of populating, Agile stories can be copied from previous examples. Just click on the three dots on the top right of an appropriate story to show the menu displayed in the below screenshot.

Click on the ‘Copy task’ option to populate a detail pane window as shown below.
5.6 Make the Appropriate Amendments to Copied Story
The Copy Task window is shown with some pre-filled ‘Include’ items which will be copied from the task clicked on when creating the new Agile story. Amend these as appropriate and don’t forget to change the name of the Story and also amend the Bucket (column) allocation as appropriate.
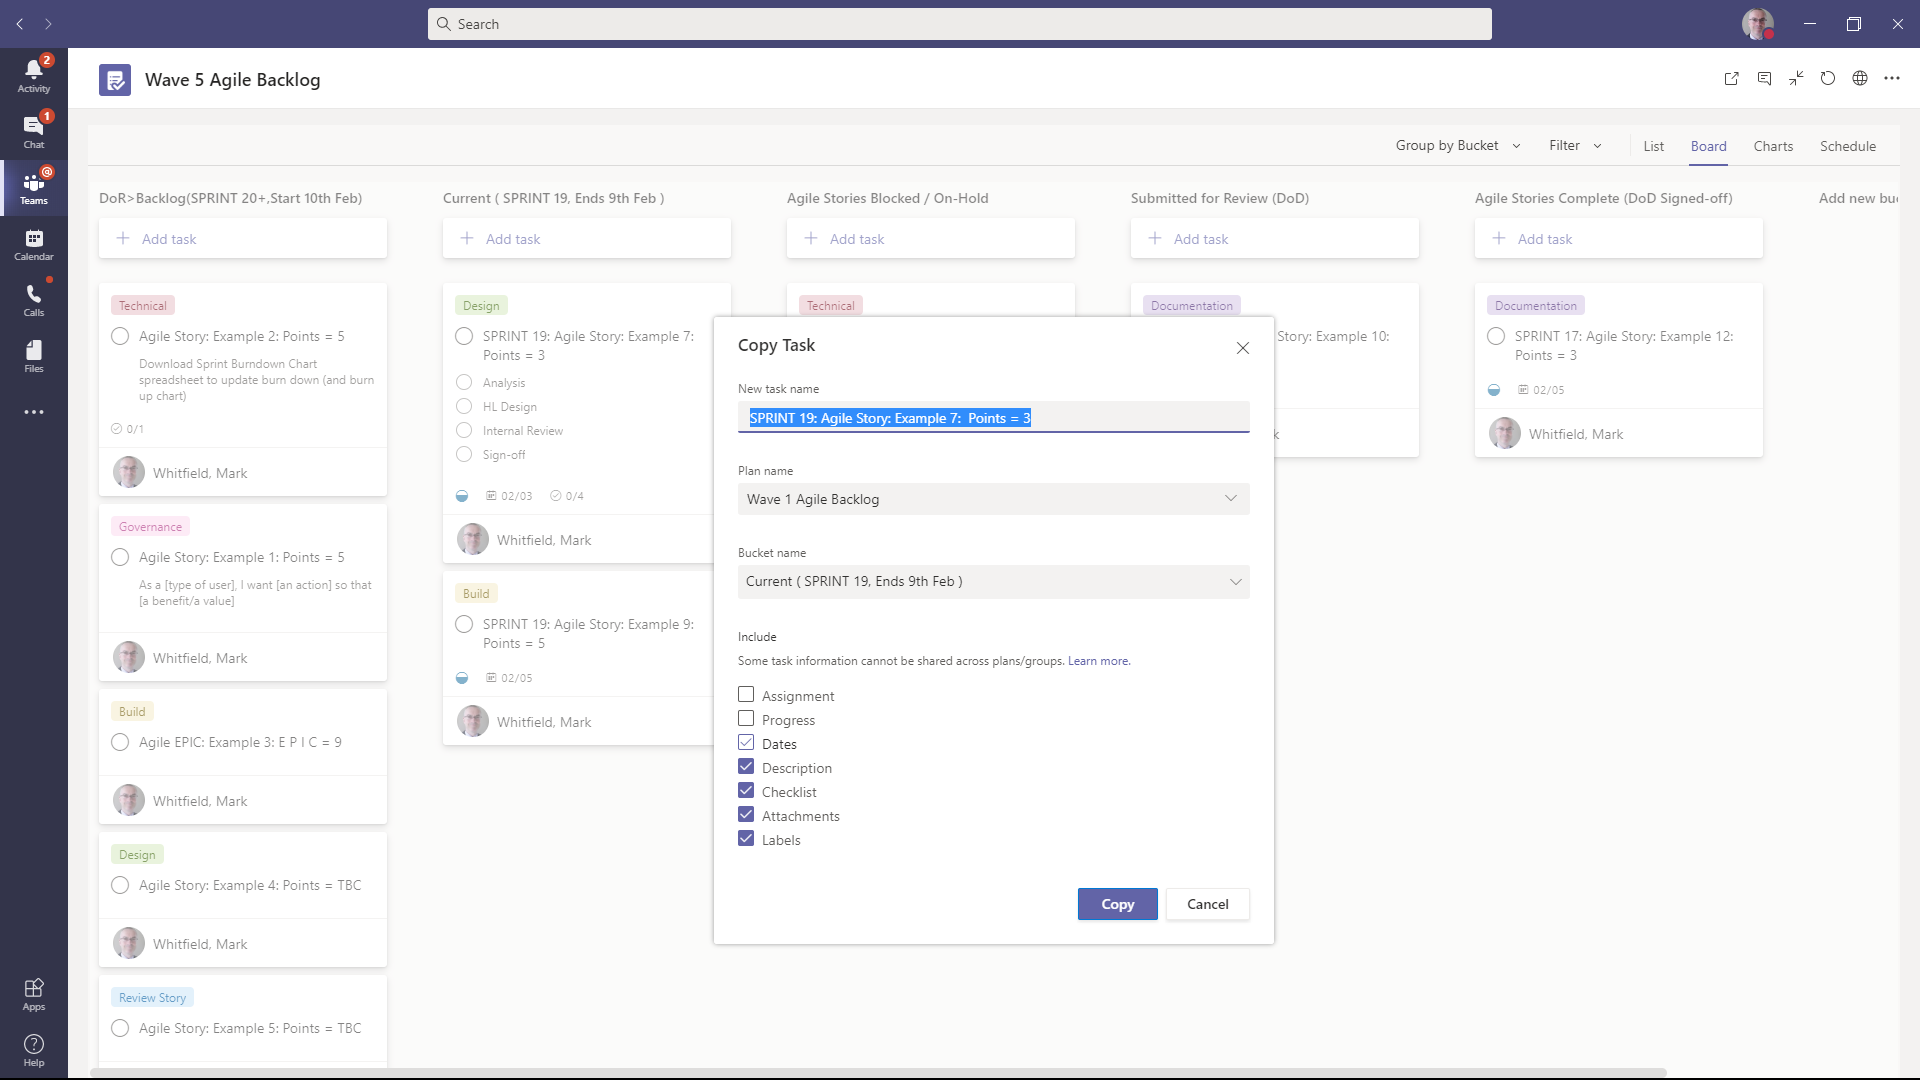
Click the ‘Copy’ button at the bottom right of the window dialog to add the new Agile Story to the Agile Project Board.
5.7 Mark the Agile Story with the Appropriate Progress Setting
Something to consider is that dragging a story to an appropriate ‘bucket’ column doesn’t necessarily change the Progress setting for that Story so make sure you go into a story and verify the Progress field is correct.

This will ensure that the Agile project board Dashboard has the right metrics for reporting purposes. Also note the priority field in the detail pane can be set as appropriate.
There is a Checklist option under the Notes field which allows you to enter a number of sub-story items and these can be checked off as they are completed. In the screenshot above, the items are; Analysis, HL Design, Internal Review and Sign-off.
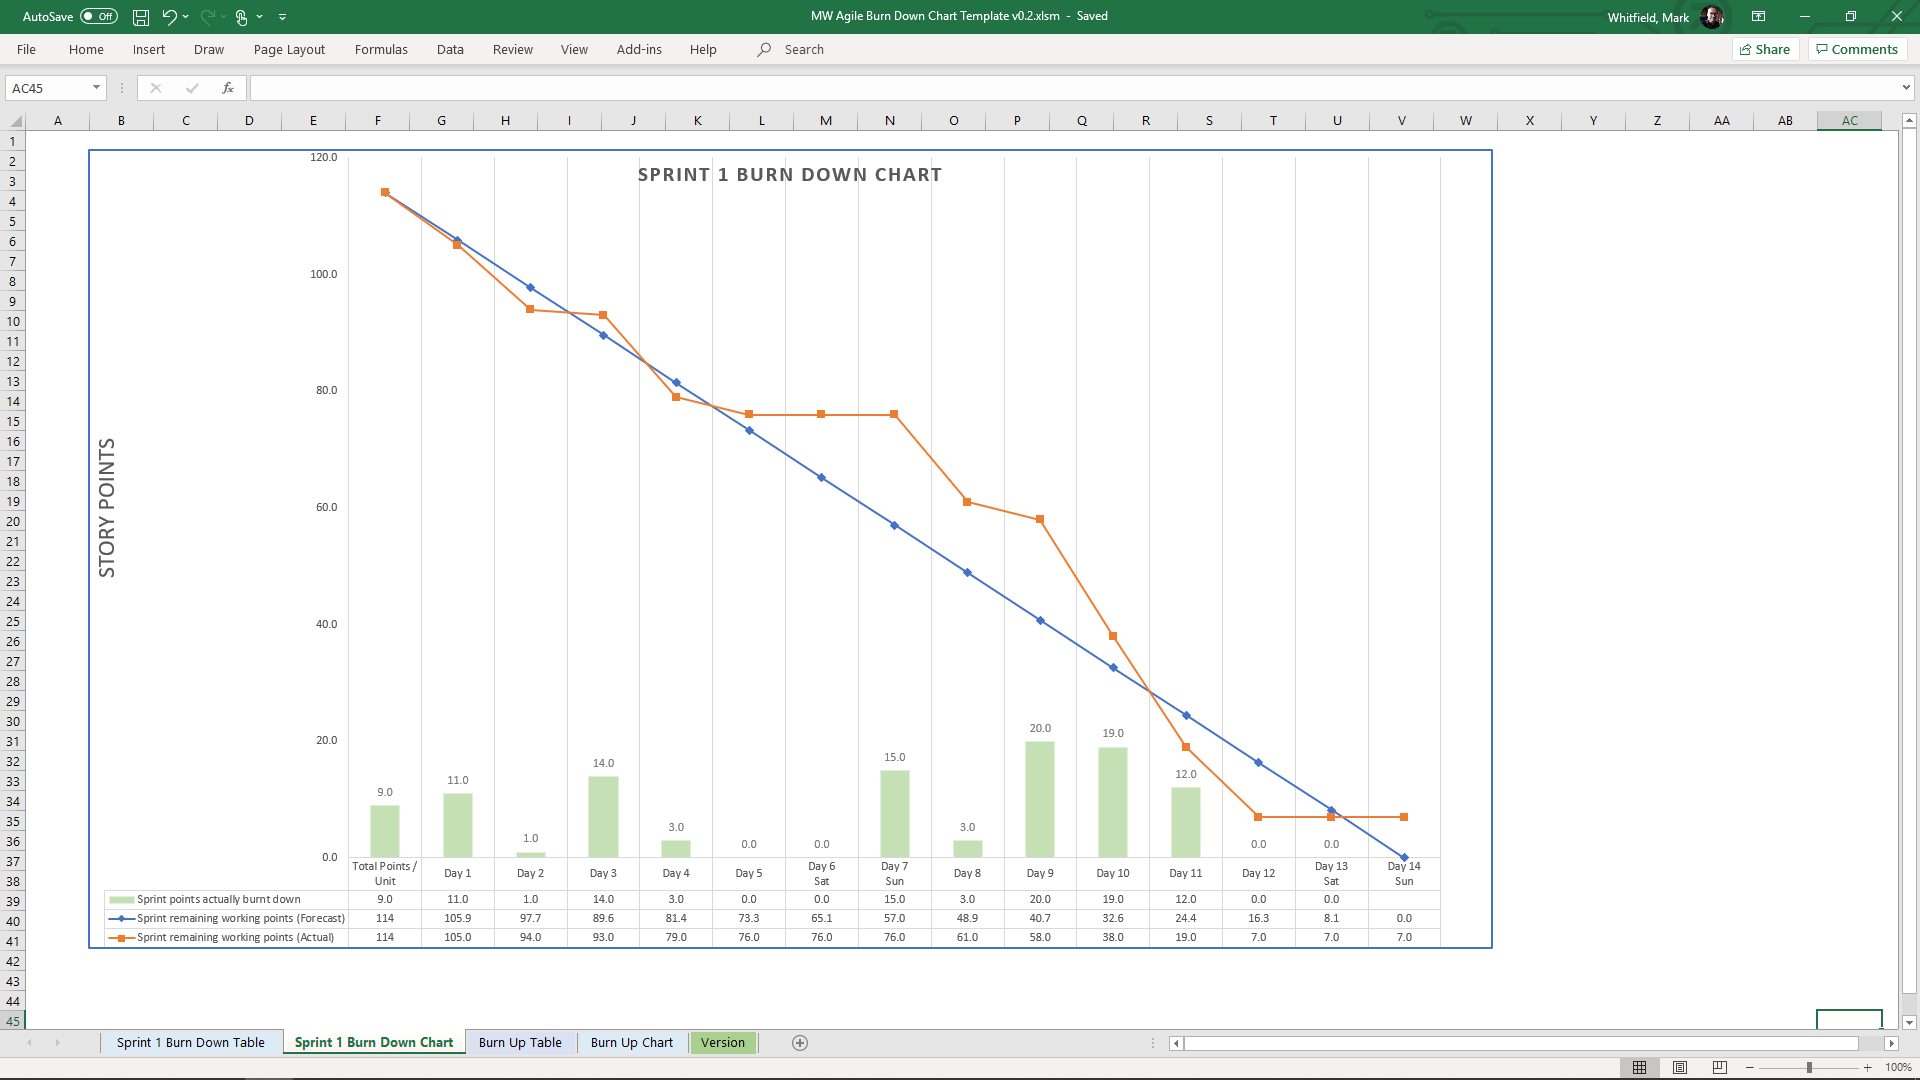
6.1 Sprint Burn Down Chart (and Burn Up Chart)
a) MS Excel Sprint Burn Down Chart Tab Example. This can be used in conjunction with the MS Teams Agile Project Board above.
b) MS Excel Sprint Burn Up Chart Tab Example

7.1 Agile Board Guidance Notes Summarised
- All Activities carried out during a sprint should be captured on the Agile Board aligning with a ‘Definition of Ready (DoR)’
- Activities for the current sprint should be 1st placed in ‘In Progress/Current Sprint’ column
- Activities should have a clear 1 line description in the title starting with a verb (e.g. ‘create‘ doc; ‘review‘ requirements; ‘update‘ spreadsheet)
- Activities completed should result in a clear and tangible ‘output’ (e.g. document, decision e-mail/minutes, sign off)
- Activities can have a more detailed description of the task in the ‘notes’ section if necessary
- Activities should be broken down to an individual action level which can be updated/progressed without dependencies on other activities where possible
- Activities should have a ‘label’ where possible
- Activities should have a resource attached to it
- Activities in ‘In Progress/Current Sprint’ are to be completed in the current sprint
- Activities that have completed (in full) should be moved to the ‘Completed’ column
- Activities can have a Definition of Done (DoD) added to the notes section if required (e.g. draft document produced and sent for review)
- Activities submitted to the Client for review should be moved to ‘Submitted for Review’ column
- Activities can be placed in ‘Blocked/On-Hold’ column if caused by an outside dependency (e.g. Client decision required) add reason to notes section
- Activities that get ‘blocked’ and Activities that will not get delivered in the current sprint should be escalated at the earliest opportunity
- Where Activities get blocked or if activities are delivered early, consider bringing forward new activities into the current sprint
- Activities completed in a sprint should be presented in the sprint ‘Show & Tell’ session
- Activities should be prioritized in Sprint Planning sessions – sprint scope should be achievable
After reading this document, also see https://youtu.be/JxXcQ7LQj4Y for a YouTube video which covers some of the same points to using the MS Teams planner but more generically.
7.2 Free Agile Videos
Free Agile Videos:
